
🌿 Layered Pasta Salad: A Colorful Twist on a Classic Favorite
Thank you so much for being here 💛 Truly. This Layered Pasta Salad is one of those recipes that instantly brightens the table—and the mood.
 By Amanda DavisJAN 9, 20264 MIN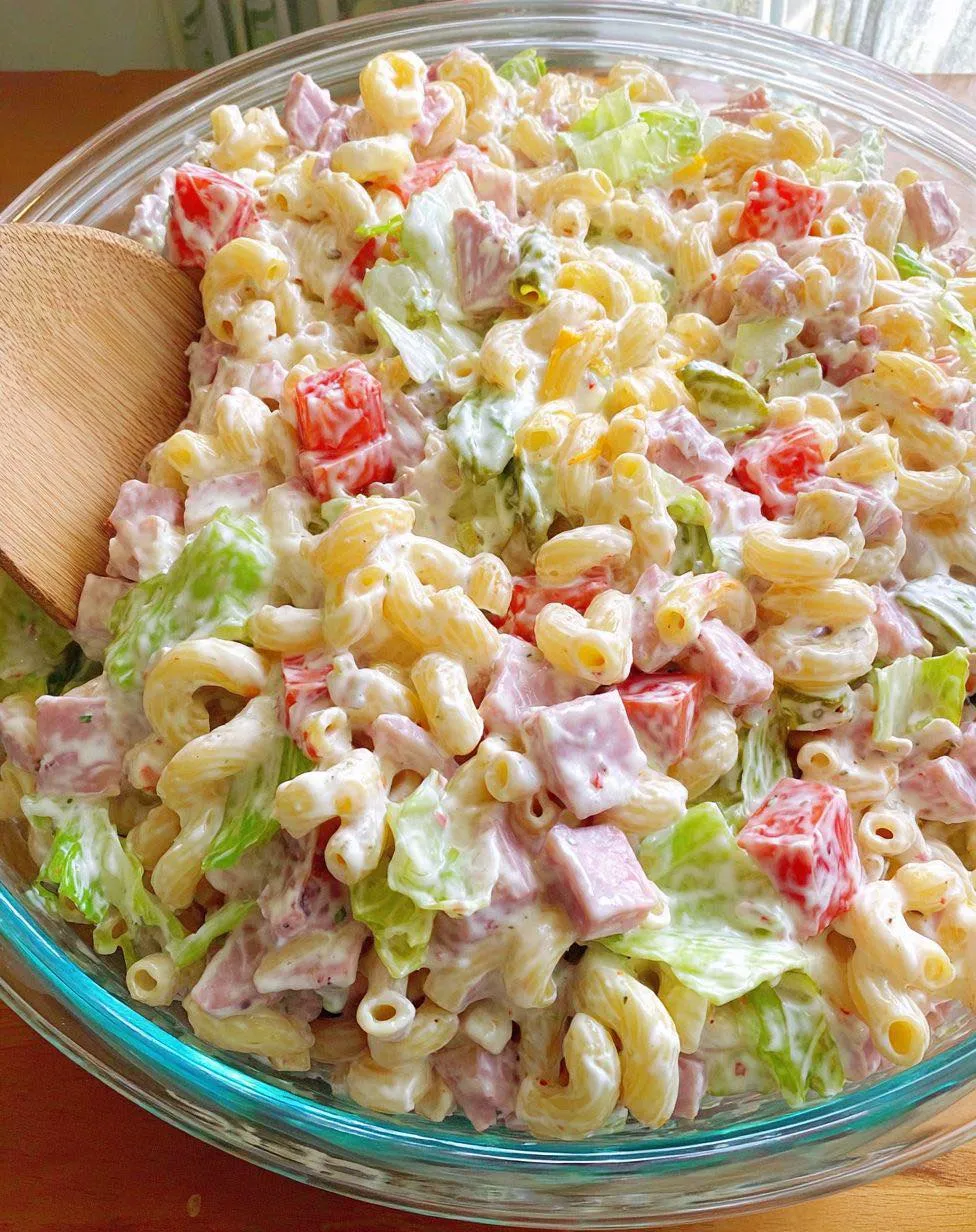
Ingredients
Instructions
- Cook pasta according to package directions until al dente. Drain and rinse with cold water to cool completely.
- In a bowl, whisk together mayonnaise, sour cream, vinegar, sugar, garlic powder, salt, and pepper until smooth. Set aside.
- In a large clear bowl, add the pasta as the bottom layer. Spread evenly.
- Layer tomatoes, cucumbers, bell peppers, red onion, peas, and bacon (if using), pressing gently to keep layers neat.
- Spread the dressing evenly over the top, sealing the layers beneath.
- Top with shredded cheese and parsley. Cover and refrigerate for at least 2 hours before serving.
Thank you so much for being here 💛 Truly. This Layered Pasta Salad is one of those recipes that instantly brightens the table—and the mood. It’s fresh, vibrant, and full of texture, with layers that make everyone lean in for a closer look before diving in. I promised you versatile, and here’s proof! This salad works for picnics, potlucks, BBQs, holidays, or even meal prep for the week.
What I love most? It’s familiar, yet elevated. A classic pasta salad—but stacked beautifully, bursting with color, and coated in a creamy dressing that ties everything together. Anything but boring!!
And if you love recipes like this, don’t forget to subscribe so you can get them straight to your inbox 🌿
🌿 Layered Pasta Salad Recipe Overview
This Layered Pasta Salad is built in a clear bowl so you can see every gorgeous layer—tender pasta, crisp veggies, savory cheese, and a creamy dressing that slowly mingles through it all. It’s as much a centerpiece as it is a side dish.
Reasons to Love This Layered Pasta Salad
- Visually stunning and crowd-pleasing
- Make-ahead friendly
- Perfect for potlucks and parties
- Easy to customize
- Fresh, creamy, and satisfying
What Does This Pasta Salad Taste Like?
Creamy, tangy, fresh, and crunchy all at once. The pasta is tender, the vegetables are crisp and refreshing, and the dressing adds a rich, slightly tangy finish that pulls everything together beautifully.
Benefits of This Recipe
- Feeds a crowd
- Great way to eat more veggies
- Budget-friendly
- Travels well
- Even better after chilling
Ingredients for Layered Pasta Salad
- 12 oz rotini or bowtie pasta, cooked and cooled
- 1 cup cherry tomatoes, halved
- 1 cup cucumber, diced
- 1 cup bell peppers, diced (mixed colors)
- ½ cup red onion, finely chopped
- 1 cup shredded cheddar or Colby Jack cheese
- ½ cup cooked bacon, crumbled (optional)
- ½ cup frozen peas (thawed)
- ¼ cup chopped fresh parsley
Creamy Dressing
- 1 cup mayonnaise
- ½ cup sour cream or Greek yogurt
- 1 tbsp apple cider vinegar or lemon juice
- 1 tsp sugar
- ½ tsp garlic powder
- Salt and black pepper, to taste
Necessary Tools for Preparation
- Large pot
- Colander
- Mixing bowl
- Whisk
- Large clear glass bowl or trifle dish
Possible Ingredient Additions and Substitutions
- Add olives for a salty bite
- Use feta or mozzarella pearls
- Swap bacon for grilled chicken
- Use ranch dressing instead of homemade
- Add corn or shredded carrots
- Make it vegetarian or gluten-free easily
How to Make Layered Pasta Salad Step by Step
Step 1: Cook the Pasta
Cook pasta according to package directions until al dente. Drain and rinse with cold water to cool completely.
Step 2: Prepare the Dressing
In a bowl, whisk together mayonnaise, sour cream, vinegar, sugar, garlic powder, salt, and pepper until smooth. Set aside.
Step 3: Start Layering
In a large clear bowl, add the pasta as the bottom layer. Spread evenly.
Step 4: Add the Veggie Layers
Layer tomatoes, cucumbers, bell peppers, red onion, peas, and bacon (if using), pressing gently to keep layers neat.
Step 5: Add the Dressing
Spread the dressing evenly over the top, sealing the layers beneath.
Step 6: Finish and Chill
Top with shredded cheese and parsley. Cover and refrigerate for at least 2 hours before serving.
What to Serve with Layered Pasta Salad
This salad pairs perfectly with:
- Grilled chicken or burgers
- BBQ ribs
- Sandwiches or sliders
- Fried chicken
- Fresh lemonade or iced tea
Storage Instructions
Store covered in the refrigerator for up to 3 days. Stir before serving leftovers for even distribution of dressing.
General Information
- Prep Time: 20 minutes
- Chill Time: 2 hours
- Total Time: 2 hours 20 minutes
- Servings: 8–10
Conclusion: A Fresh, Colorful Crowd Favorite
This Layered Pasta Salad: A Colorful Twist on a Classic Favorite is proof that simple ingredients can look stunning and taste incredible. It’s fresh, creamy, customizable, and always a hit wherever it goes. Whether you’re feeding a crowd or just craving something bright and comforting, this salad delivers every time.
If you loved this recipe, try my layered taco salad, creamy cucumber salad, or classic macaroni salad next.
I’d love to see your layers! Leave a review, share your photos on Pinterest, and let’s keep making beautiful, delicious food together 🌿💛
Nutritional Information (Approximate per Serving)
- Calories: 320
- Carbohydrates: 28g
- Fat: 20g
- Protein: 7g
- Sugar: 3g
Tips for Success
- Use a clear bowl for presentation
- Cool pasta completely before layering
- Chop vegetables evenly
- Seal the top with dressing to keep layers fresh
- Toss gently just before serving
Frequently Asked Questions
Can I make this the night before?
Yes—this salad is perfect for making ahead.
Should I mix it before serving?
Yes, gently toss right before serving.
Can I make it lighter?
Use Greek yogurt and light mayo.
Does it travel well?
Absolutely—just keep it chilled.