
🍰 Cuppa Cuppa Cake ✨🥄
Cuppa Cuppa Cake is one of those magical, old-fashioned recipes that instantly makes me smile—so thank you for being here and letting me share it with you.
 By Amanda DavisDEC 28, 20255 MIN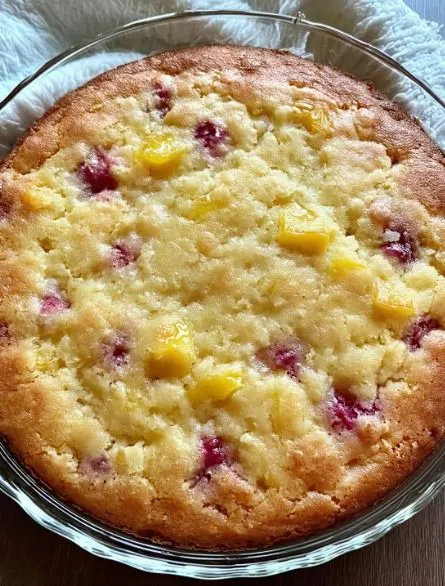
This post may contain affiliate links. If you buy something through one of them, we may earn a small commission at no extra cost to you. Learn more.
Ingredients
Instructions
- Preheat your oven to 350°F (175°C). Lightly grease your baking dish.
- Pour the fruit *with its juice* directly into the baking dish and spread it out evenly.
- Evenly sprinkle the sugar over the fruit layer. No stirring—just trust the process!
- Sprinkle the self-rising flour evenly over the sugar layer. Again, don’t mix.
- Lay the butter pats evenly across the top. Sprinkle with cinnamon or nutmeg if using.
- Bake uncovered for 45–50 minutes, until the top is golden and the edges are bubbly.
- Let cool for about 10–15 minutes before serving. It thickens slightly as it rests.
Cuppa Cuppa Cake is one of those magical, old-fashioned recipes that instantly makes me smile—so thank you for being here and letting me share it with you. Truly. This cake is pure comfort, born from simplicity, and it proves that you don’t need fancy ingredients or complicated steps to create something absolutely delicious. If you love cozy desserts that feel like a warm hug, this one is for you.
And before we get into it, don’t forget—you can subscribe to receive this recipe by email, along with more classic, easy desserts that never go out of style.
Overview of Cuppa Cuppa Cake
Cuppa Cuppa Cake gets its charming name from the fact that it uses just a cup of this and a cup of that. No mixer, no stress, no overthinking. Traditionally made with fruit (often peaches), sugar, and flour, it bakes into a tender, spoonable cake with a golden top and syrupy bottom that’s anything but boring!!
Reasons to Love This Recipe
- Incredibly easy—perfect for beginner bakers
- No mixing bowls required
- Pantry-friendly ingredients
- Endlessly customizable with different fruits
What It Tastes Like
Soft, cake-like topping with a jammy, fruity layer underneath. Sweet but not overpowering, rustic, and comforting in the best possible way. The smell when this is baking? Unreal!!
Benefits of This Recipe
- Minimal prep and cleanup
- Budget-friendly dessert
- Great for last-minute guests
- Delicious warm or cold
Ingredients for Cuppa Cuppa Cake
Here’s the classic version that never fails:
- 1 cup self-rising flour
- 1 cup granulated sugar
- 1 cup fruit, with juice (canned peaches are traditional)
- ½ teaspoon cinnamon (optional but lovely)
- ¼ teaspoon nutmeg (optional)
- ½ cup butter, sliced into pats
Optional additions:
- Vanilla extract
- Brown sugar (swap for white sugar)
- Mixed berries, apples, or pineapple
Necessary Tools for Preparation
- 8×8-inch baking dish (or similar)
- Measuring cup
- Spoon
- Knife (for butter)
Ingredient Additions and Substitutions
Cuppa Cuppa Cake is wonderfully forgiving:
- No self-rising flour? Use 1 cup all-purpose flour + 1½ teaspoons baking powder + ¼ teaspoon salt
- Different fruit: Apples, berries, cherries, or pineapple all work beautifully
- Extra richness: Add a splash of vanilla or almond extract
- Warm spice: Cinnamon, nutmeg, or cardamom add cozy flavor
How to Make Cuppa Cuppa Cake Step by Step
Step 1: Preheat the Oven
Preheat your oven to 350°F (175°C). Lightly grease your baking dish.
Step 2: Add the Fruit
Pour the fruit with its juice directly into the baking dish and spread it out evenly.
Step 3: Sprinkle the Sugar
Evenly sprinkle the sugar over the fruit layer. No stirring—just trust the process!
Step 4: Add the Flour
Sprinkle the self-rising flour evenly over the sugar layer. Again, don’t mix.
Step 5: Top with Butter
Lay the butter pats evenly across the top. Sprinkle with cinnamon or nutmeg if using.
Step 6: Bake
Bake uncovered for 45–50 minutes, until the top is golden and the edges are bubbly.
Step 7: Cool Slightly and Serve
Let cool for about 10–15 minutes before serving. It thickens slightly as it rests.
What to Serve with Cuppa Cuppa Cake
This humble dessert shines even brighter with:
- Vanilla ice cream
- Whipped cream
- Custard or pouring cream
- A cup of hot coffee or tea
Storage Instructions
- Refrigerator: Store covered for up to 4 days
- Reheating: Warm gently in the microwave or oven
- Freezing: Not ideal, but possible—texture may soften
General Information
Cuppa Cuppa Cake is a Southern classic that’s been passed down for generations. It’s often served at family gatherings, church suppers, and weeknight dinners when something sweet is needed—fast.
Conclusion
Cuppa Cuppa Cake is proof that simple recipes are often the best ones. With just a few basic ingredients and almost no effort, you get a comforting, nostalgic dessert that feels like home. Whether you’re baking for family, friends, or just yourself, this is one of those recipes you’ll come back to again and again.
If you loved this, you might also enjoy Old-Fashioned Peach Cobbler, Easy Dump Cake, or Southern Bread Pudding—all cozy classics worth baking.
Interactive Elements
I’d love to know—did you make this with peaches or try another fruit? Leave a review below and share your photos on Pinterest, tagging me so I can see your beautiful, golden cakes.
Nutritional Information (Approximate per Serving)
- Calories: 310
- Carbohydrates: 44g
- Fat: 14g
- Protein: 3g
- Fiber: 2g
Tips for Success
- Do not stir the layers—this is key to the texture
- Use fruit with juice for that syrupy base
- Slice butter thinly so it melts evenly
- Serve warm for peak comfort
Frequently Asked Questions
Why is it called Cuppa Cuppa Cake?
Because it traditionally uses one cup of each main ingredient—easy to remember and even easier to make.
Can I use fresh fruit?
Yes! Just add a little extra liquid if the fruit is very dry.
Is this the same as a dump cake?
Similar, but more old-fashioned and less processed.
Can I double the recipe?
Absolutely—use a 9×13-inch pan and add 10–15 minutes to baking time.
Is it supposed to be gooey?
Yes! That soft, spoonable texture is part of the charm.