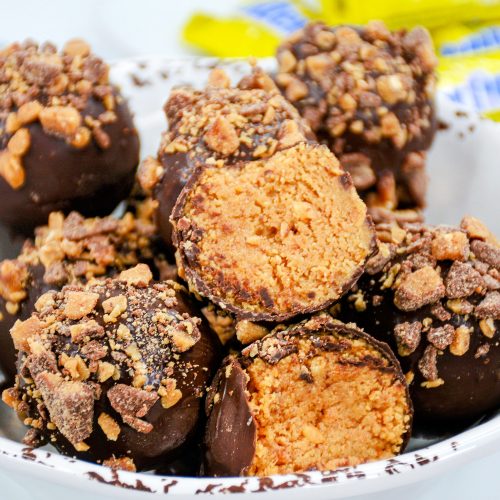
Imagine sinking your teeth into a creamy, peanut-buttery center, packed with the unmistakable crunch and flavor of Butterfinger, all wrapped in a smooth chocolate coating. Sounds heavenly, right? That’s exactly what you get with these Butterfinger Balls!
This no-bake recipe is ridiculously easy, making it perfect for parties, gifting, or just satisfying those sweet cravings in no time. Plus, with only a handful of ingredients, these bite-sized treats are as budget-friendly as they are delicious.
Before we dive into the details, make sure to subscribe to my email list for more easy, indulgent dessert recipes delivered straight to your inbox. Trust me, you won’t want to miss them!
Why You’ll Love These Butterfinger Balls
- No baking required: Perfect for busy days or when you don’t want to heat up the kitchen.
- Minimal ingredients: Only five ingredients stand between you and sweet bliss.
- Irresistible flavor: The creamy peanut butter, crunchy Butterfinger, and rich chocolate create a match made in dessert heaven.
- Great for sharing: These are bite-sized, portable, and always a hit at parties or holiday gatherings.
Ingredients for Butterfinger Balls
Here’s what you need to whip up these no-bake delights:
- 1 cup creamy peanut butter
- 2 cups powdered sugar
- 1 cup crushed Butterfinger candy bars (about 4 regular-sized bars)
- 2 tbsp unsalted butter, softened
- 12 oz semi-sweet chocolate chips (or candy melts)
Tools You’ll Need
- Mixing bowl
- Spoon or spatula
- Baking sheet
- Parchment paper or wax paper
- Microwave-safe bowl
How to Customize Your Butterfinger Balls
Looking to switch things up? Here are some easy variations:
- Use white chocolate or dark chocolate instead of semi-sweet for the coating.
- Add a pinch of sea salt on top for a sweet-and-salty twist.
- Substitute crushed toffee or another candy bar for the Butterfinger for a different flavor.
- Drizzle the finished balls with a contrasting chocolate for an elegant finish.
Step-by-Step Instructions for Butterfinger Balls
Step 1: Crush the Butterfingers
Place the Butterfinger candy bars in a zip-top bag and crush them using a rolling pin or heavy object until they’re finely crumbled. Set aside.
Step 2: Make the Peanut Butter Mixture
In a large mixing bowl, combine the peanut butter, powdered sugar, softened butter, and crushed Butterfinger pieces. Stir until everything is well mixed and forms a dough-like consistency.
Step 3: Shape the Balls
Scoop out about 1 tablespoon of the mixture and roll it between your hands to form a ball. Place the balls on a baking sheet lined with parchment or wax paper. Repeat until all the mixture is used.
Step 4: Chill the Balls
Refrigerate the balls for 20–30 minutes, or until firm. This helps them hold their shape when dipped in chocolate.
Step 5: Melt the Chocolate
In a microwave-safe bowl, melt the chocolate chips in 20-second intervals, stirring in between, until smooth. Be careful not to overheat the chocolate.
Step 6: Dip and Coat
Using a fork or candy-dipping tool, dip each chilled ball into the melted chocolate, ensuring it’s fully coated. Gently tap off the excess chocolate and place the ball back onto the parchment-lined baking sheet.
Step 7: Let the Chocolate Set
Allow the chocolate coating to harden at room temperature or speed up the process by placing the baking sheet in the refrigerator for about 10 minutes.
Serving Suggestions
These Butterfinger Balls are delicious on their own, but here are a few fun ways to enjoy or serve them:
- Arrange them in decorative boxes for gifting.
- Serve as part of a dessert platter with other bite-sized treats.
- Crumble leftover Butterfinger Balls over ice cream for a decadent topping.
Tips for Perfect Butterfinger Balls
- Don’t skip chilling the balls before dipping: It makes the process much easier and prevents the peanut butter mixture from falling apart in the chocolate.
- Use room-temperature peanut butter and butter: This ensures the mixture blends smoothly.
- Work in batches: If the balls start to soften while dipping, pop them back in the fridge for a few minutes.
How to Store Butterfinger Balls
- Room Temperature: Store in an airtight container for up to 3 days.
- Refrigerator: Keep in the fridge for up to 1 week.
- Freezer: Freeze in a sealed container for up to 3 months. Thaw at room temperature before serving.
Frequently Asked Questions
Can I use chunky peanut butter?
Yes, chunky peanut butter will add a little extra texture to the filling, which some people love!
What if I don’t have Butterfinger candy bars?
You can substitute other crispy, peanut-buttery candy bars, or even crushed graham crackers with a drizzle of caramel for a similar vibe.
How can I make the chocolate coating shinier?
Adding 1 teaspoon of coconut oil or vegetable shortening to the chocolate when melting will give it a smoother, shinier finish.
Why You’ll Fall in Love with These Butterfinger Balls
Butterfinger Balls are everything you want in a dessert: sweet, indulgent, and so simple to make. Whether you’re treating yourself or sharing with loved ones, these little bites of heaven will quickly become a favorite.
If you give this recipe a try, I’d love to see your creations! Snap a photo and share it on Pinterest or leave a comment below. Don’t forget to tag me so I can celebrate your success!
More Sweet Treats to Try:
- No-Bake Oreo Truffles
- Peanut Butter Buckeye Bars
- Chocolate-Covered Pretzel Bites
Nutritional Information (Per Serving, 1 Ball):
- Calories: 120
- Carbs: 12g
- Fat: 7g
- Protein: 2g
Enjoy every creamy, chocolatey bite! ❤️
