
Peanut Butter Cup Dump Cake
First, thank you so much for being here, my fellow dessert lovers! 💛 You already know I have a soft spot for easy, indulgent sweets…
 By Amanda DavisOCT 12, 20256 MIN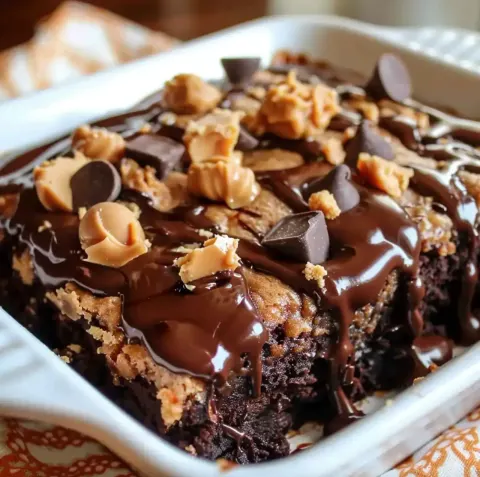
This post may contain affiliate links. If you buy something through one of them, we may earn a small commission at no extra cost to you. Learn more.
Ingredients
Instructions
- Set your oven to 350°F (175°C) and lightly grease a 9×13-inch baking dish.
- In a large bowl, whisk together the instant chocolate pudding mix and 3 cups of milk until smooth. Let it sit for 2–3 minutes to thicken slightly.
- Pour the dry chocolate cake mix directly into the pudding mixture. Stir gently until mostly combined — don’t overmix! You want that thick, luscious texture.
- Warm the peanut butter slightly in the microwave (about 20 seconds) to make it easier to drizzle. Drop spoonfuls over the batter, then use a knife to gently swirl it in.
- Sprinkle chopped peanut butter cups evenly over the top. Press them in lightly so they bake into the cake.
- Bake at 350°F for 35–40 minutes, or until the edges are set but the center is still slightly gooey. The smell at this point? Pure chocolate-peanut butter heaven!
- Let it cool for at least 15 minutes before serving. The center will be warm, soft, and pudding-like — pure magic with a scoop of vanilla ice cream on top.
- I’m kicking myself for not having filmed this moment — the peanut butter just *melts* into the chocolate in the most satisfying way. Anything but boring!!
First, thank you so much for being here, my fellow dessert lovers! 💛 You already know I have a soft spot for easy, indulgent sweets — and this one is a chocolate-peanut butter dream come true.
If you’ve ever wanted a dessert that tastes like a cross between a molten lava cake and a peanut butter cup, you’re in for a treat. This Peanut Butter Cup Dump Cake is rich, gooey, and full of that irresistible sweet-salty flavor combo that makes everyone go back for seconds.
And if you’d love to have more of my decadent dessert recipes delivered straight to your inbox (because who doesn’t love a shortcut to happiness?), make sure to subscribe to my email list so you never miss a recipe drop!
Overview of the Recipe
Dump cakes are the ultimate in low-effort, high-reward desserts — you literally just dump, bake, and enjoy! This one starts with a box of chocolate cake mix and instant chocolate pudding, swirled with creamy peanut butter and topped with chunks of peanut butter cups. It’s gooey, rich, and utterly satisfying.
It’s perfect for holidays, potlucks, weeknight cravings, or anytime you need a quick dessert that looks and tastes like you spent hours in the kitchen.
Reasons to Love This Recipe
- Only a handful of ingredients — all pantry staples!
- No mixer, no fuss — just mix, dump, and bake.
- Decadently rich — chocolate + peanut butter = perfection.
- Customizable — make it extra gooey or cake-like to your preference.
- Crowd-pleaser — everyone loves that peanut butter cup surprise inside!
Description of the Taste
This Peanut Butter Cup Dump Cake is the definition of indulgent. The chocolate cake layer bakes up soft and fudgy, while the pudding keeps it moist and gooey. Every bite has swirls of creamy peanut butter and melty bits of peanut butter cups that make your taste buds dance. It’s like a warm, gooey hug in dessert form.
Benefits of This Recipe
- Fast prep: 10 minutes and into the oven it goes.
- Affordable ingredients: No specialty items needed.
- Feeds a crowd: Great for family gatherings or bake sales.
- Versatile: Serve warm with ice cream or cold from the fridge — both are divine!
Ingredients for Peanut Butter Cup Dump Cake
- 1 box chocolate cake mix
- 1 package (3.9 oz) instant chocolate pudding mix
- 3 cups whole milk
- 1 cup creamy peanut butter
- 1 cup chopped peanut butter cups (plus extra for topping, optional)
Necessary Tools for Preparation
- 9×13-inch baking dish
- Mixing bowl
- Whisk or electric hand mixer
- Rubber spatula
- Measuring cups and spoons
Ingredient Additions and Substitutions
- Make it extra rich: Add ½ cup of chocolate chips or drizzle hot fudge on top before baking.
- Add crunch: Sprinkle crushed pretzels or chopped peanuts over the batter.
- Go lighter: Use sugar-free pudding mix and reduced-fat peanut butter.
- Try another flavor combo: Use white or yellow cake mix with Reese’s Pieces for a fun twist!
Step-by-Step Instructions on How to Make Peanut Butter Cup Dump Cake
Step 1: Preheat the Oven
Set your oven to 350°F (175°C) and lightly grease a 9×13-inch baking dish.
Step 2: Mix the Pudding
In a large bowl, whisk together the instant chocolate pudding mix and 3 cups of milk until smooth. Let it sit for 2–3 minutes to thicken slightly.
Step 3: Add the Cake Mix
Pour the dry chocolate cake mix directly into the pudding mixture. Stir gently until mostly combined — don’t overmix! You want that thick, luscious texture.
Step 4: Swirl in Peanut Butter
Warm the peanut butter slightly in the microwave (about 20 seconds) to make it easier to drizzle. Drop spoonfuls over the batter, then use a knife to gently swirl it in.
Step 5: Add Peanut Butter Cups
Sprinkle chopped peanut butter cups evenly over the top. Press them in lightly so they bake into the cake.
Step 6: Bake
Bake at 350°F for 35–40 minutes, or until the edges are set but the center is still slightly gooey. The smell at this point? Pure chocolate-peanut butter heaven!
Step 7: Cool and Serve
Let it cool for at least 15 minutes before serving. The center will be warm, soft, and pudding-like — pure magic with a scoop of vanilla ice cream on top.
I’m kicking myself for not having filmed this moment — the peanut butter just melts into the chocolate in the most satisfying way. Anything but boring!!
What to Serve with Peanut Butter Cup Dump Cake
- Vanilla ice cream or whipped cream — the classic combo.
- Drizzle of chocolate or caramel sauce for extra decadence.
- Glass of cold milk or cup of coffee to balance the richness.
- Chopped peanuts or Reese’s Pieces sprinkled on top for crunch.
Storage Instructions
- Refrigerator: Store leftovers covered for up to 4 days.
- Freezer: Freeze individual portions in airtight containers for up to 2 months.
- Reheat: Warm in the microwave for 20–30 seconds or enjoy cold straight from the fridge (no judgment here!).
General Information
- Prep Time: 10 minutes
- Cook Time: 35–40 minutes
- Total Time: 45–50 minutes
- Servings: 10–12
Conclusion
If you love the classic chocolate-and-peanut-butter combo, this Peanut Butter Cup Dump Cake will be your new go-to dessert. It’s gooey, fudgy, and packed with peanut butter flavor in every bite — the kind of sweet comfort you’ll want to share (or maybe not!).
I promised you easy, rich, and indulgent — and this one delivers in every way! Whether you’re baking for a family night, a party, or just a personal treat, this dump cake is guaranteed to steal the show.
And if you enjoyed this recipe, don’t miss my Chocolate Peanut Butter Poke Cake or Reese’s Fudge Brownie Trifle — both are chocolate-lover favorites that never disappoint!
Interactive Element
I’d love to see how your Peanut Butter Cup Dump Cake turned out! 💕 Tag your photos on Pinterest or share them in the comments — tell me if you added extra peanut butter cups (I always do!). Your creativity and feedback make this baking community so special.
Nutritional Information (per serving)
- Calories: ~420 kcal
- Carbohydrates: 52g
- Protein: 8g
- Fat: 21g
- Saturated Fat: 8g
- Cholesterol: 45mg
- Sodium: 420mg
- Sugar: 34g
Tips for Success
- Don’t overmix the batter: You want swirls of pudding and cake for that signature “dump cake” texture.
- Use whole milk: It gives a creamier, richer flavor than lower-fat versions.
- Warm the peanut butter: Makes swirling easier and more even.
- Watch the bake time: You want gooey, not dry — start checking at 35 minutes.
- Let it rest before serving: The pudding layer thickens as it cools.
Frequently Asked Questions
Can I make this recipe ahead of time?
Absolutely! It’s even better the next day — the flavors meld and the texture stays perfectly moist.
Can I use chunky peanut butter?
Yes, if you love a bit of crunch. Chunky peanut butter adds texture and extra peanut flavor.
What other candy can I use instead of peanut butter cups?
Try Snickers, Reese’s Pieces, or chopped chocolate bars — all delicious options!
Can I use pudding cooked on the stove?
Stick with instant pudding for best results — it thickens perfectly with no extra heat.
More Recipes You'll Love
All Dinner Dinner
Deep-Fried Bacon Cheeseburger Corn Dogs
First, thank you so much for being here and sharing your love for all things crispy, cheesy, and downright indulgent!
 Dinner
Mac and Cheese Meatloaf Casserole
First, thank you so much for stopping by — truly! 💛 Every time I share a cozy, hearty, family-style recipe…
 Dinner
Crock Pot Potato Broccoli Cheddar Soup
First, thank you so much for being here and sharing my love for cozy comfort food. 💛 You know those recipes that fill your home with the kind of aroma that…
 Dinner
Easy Potatoes au Gratin
There’s something about Easy Potatoes au Gratin that just feels like home, isn’t there? That creamy, cheesy…
 Dinner
Easy Heavenly Caramel Banana Roll Cake
Easy Heavenly Caramel Banana Roll Cake 🍌✨ – A Cloud of Sweet, Creamy Perfection! First things first — thank you for being here!
 Dinner
Million Dollar Spaghetti Casserole
Million Dollar Spaghetti Casserole 🍝💰 – Rich, Creamy & Totally Irresistible! Before we dig into this ultimate comfort food, I just want to say…
 Dinner
Loaded Broccoli Potato Soup 🥦🥔🤤 – Creamy, Cheesy, and Comfort in a Bowl!
Hey there, soup lover! 💛 Before we ladle into this bowl of pure comfort, I just want to say thank you for being here — your love for cozy…
 Dinner
Chile Verde Sopita 🌶️🍲 – A Comforting Bowl of Mexican Green Goodness
First, let me start with a big thank you for stopping by! 💚 Your love for authentic, heartwarming recipes makes creating and sharing dishes like this one…