
Super Simple and Quick Blender Apple Pie
Super Simple and Quick Blender Apple Pie is one of those magical recipes that makes you stop and say, why didn’t I try this sooner?!
 By Amanda DavisJAN 4, 20265 MIN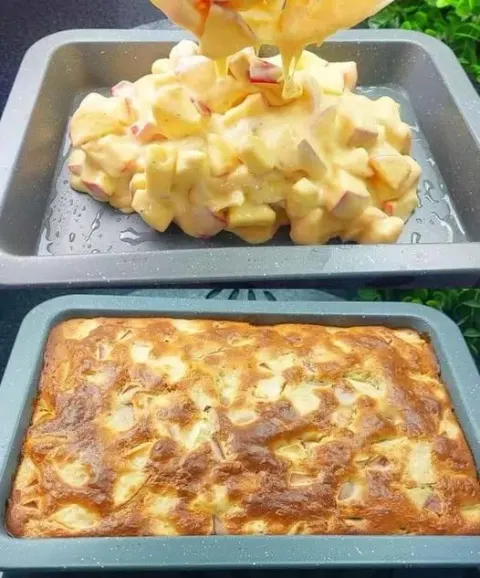
Ingredients
Instructions
- Peel, core, and slice the apples. Spread them evenly in a greased pie dish and sprinkle lightly with cinnamon.
- Add milk, eggs, sugar, flour, melted butter, baking powder, vanilla, salt, and cinnamon to the blender. Blend until smooth and fully combined.
- Carefully pour the blender batter over the apples. Gently shake the dish to help the batter settle around the apples.
- Bake until the pie is set in the center and lightly golden on top. The edges should be slightly puffed and fragrant.
- Let the pie cool for a few minutes before slicing. It will firm up as it rests.
Super Simple and Quick Blender Apple Pie is one of those magical recipes that makes you stop and say, why didn’t I try this sooner?! I’m so genuinely grateful you’re here, because this little gem proves that homemade dessert doesn’t have to be complicated to be amazing. When time is short but the craving for something warm, cozy, and apple-filled hits—this recipe absolutely saves the day.
I promised you easy, anything-but-boring recipes, and this blender apple pie is proof. It comes together fast, uses basic ingredients, and still delivers all those classic apple pie flavors we love. And before we jump in, don’t forget to subscribe to receive this recipe by email, plus more quick and comforting desserts straight to your inbox.
Overview of This Super Simple and Quick Blender Apple Pie Recipe
This recipe is exactly what it sounds like—most of the batter is made right in the blender, cutting prep time way down. Tender apples bake into a lightly spiced, custard-like pie that’s part pie, part cake, and completely irresistible.
Reasons to Love This Recipe
- Made almost entirely in the blender
- No rolling dough or complicated steps
- Perfect for beginners
- Warm, cozy apple pie flavor in record time
- Minimal cleanup (yes, please!)
What Does Super Simple and Quick Blender Apple Pie Taste Like?
It’s lightly sweet, warmly spiced, and full of soft, cinnamon-kissed apples. The texture is somewhere between a classic apple pie and a soft baked custard, with golden edges and a tender center. Served warm, it’s pure comfort.
Benefits of This Recipe
- Quick prep with everyday ingredients
- Budget-friendly dessert
- Perfect last-minute treat
- Easily customizable
Ingredients for Super Simple and Quick Blender Apple Pie
Here’s all you need to whip this up:
- Apples, peeled and sliced
- Milk
- Eggs
- Granulated sugar
- All-purpose flour
- Unsalted butter, melted
- Baking powder
- Vanilla extract
- Ground cinnamon
- Salt
Kitchen Tools You’ll Need
- Blender
- Mixing bowl
- Measuring cups and spoons
- Pie dish or baking dish
- Knife and cutting board
Ingredient Additions and Substitutions
This recipe is wonderfully flexible:
- Apples: Granny Smith, Honeycrisp, or Fuji work great
- Sugar: Swap part of the sugar for brown sugar for deeper flavor
- Spices: Add nutmeg or apple pie spice
- Milk: Dairy-free milk works just fine
How to Make Super Simple and Quick Blender Apple Pie
Step 1: Prepare the Apples
Peel, core, and slice the apples. Spread them evenly in a greased pie dish and sprinkle lightly with cinnamon.
Step 2: Blend the Batter
Add milk, eggs, sugar, flour, melted butter, baking powder, vanilla, salt, and cinnamon to the blender. Blend until smooth and fully combined.
Step 3: Assemble
Carefully pour the blender batter over the apples. Gently shake the dish to help the batter settle around the apples.
Step 4: Bake
Bake until the pie is set in the center and lightly golden on top. The edges should be slightly puffed and fragrant.
Step 5: Cool Slightly and Serve
Let the pie cool for a few minutes before slicing. It will firm up as it rests.
What to Serve with Super Simple and Quick Blender Apple Pie
This dessert shines with simple toppings:
- Vanilla ice cream
- Whipped cream
- A dusting of powdered sugar
- A drizzle of caramel sauce
Storage Instructions
- Refrigerator: Store covered for up to 3 days
- Reheating: Warm slices in the microwave or oven
- Freezing: Can be frozen, though texture is best fresh
General Recipe Information
This blender apple pie is perfect when you want homemade dessert without the hassle. It’s great for weeknights, potlucks, or anytime you want something sweet and comforting without spending hours in the kitchen.
Conclusion
Super Simple and Quick Blender Apple Pie is proof that easy desserts can still feel special. Warm apples, cozy spices, and a blender-does-all batter make this a recipe you’ll come back to again and again—especially when time is short but cravings are big.
If you loved this recipe, be sure to try other quick apple favorites like apple crisp, apple dump cake, or baked cinnamon apples for even more cozy inspiration.
I’d love to hear what you think! Leave a review, and don’t forget to share your photos on Pinterest so I can see your beautiful, apple-filled creations.
Nutritional Information (Approximate per Serving)
- Calories: 290
- Carbohydrates: 42g
- Fat: 11g
- Protein: 5g
- Fiber: 3g
- Sugar: 26g
Tips for Success
- Slice apples evenly for consistent baking
- Don’t overfill the dish—the pie will puff slightly
- Serve warm for the best texture and flavor
- Let it cool briefly so slices hold together
Frequently Asked Questions
Do I need a crust for this pie?
Nope! The batter bakes into a soft, custardy base that replaces the crust.
Can I make this ahead of time?
Yes—make it earlier in the day and reheat gently before serving.
Is this more like pie or cake?
It’s somewhere in between—soft, custardy, and full of apple flavor.
Can I reduce the sugar?
Yes, you can slightly reduce it without affecting the texture too much.
More Recipes You'll Love
All Dinner Dinner
Stuffed Pepper Soup
Stuffed Pepper Soup is one of those recipes I make when I want all the cozy comfort of classic stuffed peppers without the extra work—and I’m truly…
 Dinner
Classic Three-Envelope Roast Recipe
Classic Three-Envelope Roast Recipe is one of those tried-and-true comfort meals that feels like a gift every single time you make it.
 Dinner
Southern-Style Tennessee Peach Pudding
Southern-Style Tennessee Peach Pudding is pure comfort, and I’m genuinely so grateful you’re here to experience it with me.
 Dinner
French Onion Meatloaf with Swiss Cheese
French Onion Meatloaf with Swiss Cheese is one of those recipes I can’t stop smiling about—thank you, truly, for being here and cooking along with me.
 Dinner
Grandma’s Cake Recipe (Classic Granny Cake)
Grandma’s Cake Recipe, lovingly known as Granny Cake, thank you so much for being here. 💛 Recipes like this one are pure comfort to me—simple, humble…
 Dinner
Layered Sweet Potato, Squash & Parsnip Bake with Cranberry-Honey Drizzle
Layered Sweet Potato, Squash & Parsnip Bake with Cranberry-Honey Drizzle—thank you so much for being here.
 Dinner
Frozen Strawberry Protein Cream Bites
Frozen Strawberry Protein Cream Bites—thank you so much for being here. 💕 I truly appreciate you choosing recipes that support feeling good and enjoying…
 Dinner
Homemade Mousse Dessert: Simple Recipe Perfect for Special Occasions
Homemade Mousse Dessert—thank you so much for being here. 💛 I truly appreciate you choosing recipes that turn ordinary moments into something a little more…