
3-Ingredient Pan-Fried Halloumi – Crispy, Salty & Shockingly Easy
3-Ingredient Pan-Fried Halloumi Thank you so much for being here today—truly. This recipe makes me giddy because it is unbelievably simple yet tastes like…
 By Amanda DavisNOV 25, 20254 MIN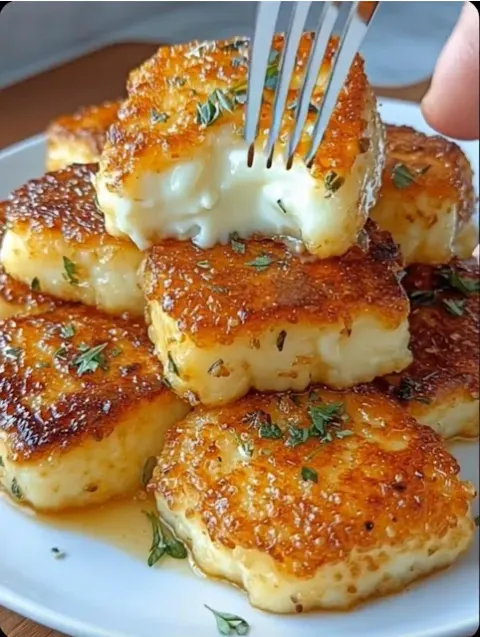
This post may contain affiliate links. If you buy something through one of them, we may earn a small commission at no extra cost to you. Learn more.
Ingredients
Instructions
- Remove halloumi from packaging and pat dry. Slice into ½-inch pieces—thicker slices stay soft and chewy, thinner slices get extra crispy.
- Warm olive oil in a skillet over medium heat until shimmery.
- Place halloumi slices in a single layer. Cook 2–3 minutes per side, or until golden brown and crisp.
- Remove from heat and drizzle with lemon juice. Add optional garnishes.
- Halloumi is best enjoyed hot and fresh from the pan.
3-Ingredient Pan-Fried Halloumi
Thank you so much for being here today—truly. This recipe makes me giddy because it is unbelievably simple yet tastes like something you’d order from a chic Mediterranean café. 3-Ingredient Pan-Fried Halloumi is crispy on the outside, warm and squeaky on the inside, and so flavorful that it’s almost unfair how easy it is to make. Anything but boring!!
Every time I sear halloumi and hear that perfect sizzle, I wonder why I don’t make it daily. The aroma, the caramelized edges, the salty bite—this is comfort food meets elegance, and you only need three ingredients. Yep. Three.
Before we jump in, don’t forget to subscribe to get this recipe delivered straight to your inbox, plus more fast, bold, Mediterranean-inspired dishes.
Overview of 3-Ingredient Pan-Fried Halloumi
This dish is exactly what it sounds like—three simple ingredients cooked quickly in a skillet until golden, crispy, and irresistibly delicious. It’s the quickest snack, appetizer, or protein-rich side you’ll ever add to your rotation.
Why You’ll Love This Recipe
- Ready in under 10 minutes
- High-protein, low-carb
- Perfect for keto, Mediterranean diets, and gluten-free eating
- Delicious on its own or with dips
- Amazing appetizer for entertaining
- Works with countless toppings and variations
What Does Pan-Fried Halloumi Taste Like?
Salty, buttery, crispy, warm, and slightly chewy—like the best grilled cheese without the bread. The outside browns beautifully, while the inside stays soft and squeaky (in the best way!). If you’ve never tried halloumi, get ready to fall in love.
Benefits of This Recipe
- Minimal prep
- High in protein and calcium
- Perfect for low-carb or keto diets
- Budget-friendly and filling
- Great hot or room temperature
- Makes an impressive appetizer with no effort
Ingredients
- 1 block halloumi cheese (8 oz)
- 1 tablespoon olive oil
- 1 teaspoon lemon juice (or your favorite seasoning)
Optional garnishes: fresh parsley, chili flakes, honey drizzle, za’atar, or cracked pepper
Tools You’ll Need
- Nonstick skillet or cast-iron pan
- Sharp knife
- Spatula
- Paper towels
Ingredient Additions & Substitutions
- Substitute lemon juice with balsamic glaze or chili oil
- Add herbs: oregano, thyme, dill
- Make it spicy: red pepper flakes or hot honey
- Use ghee or butter instead of olive oil for deeper flavor
- Add citrus zest for brightness
- Serve with dips: tzatziki, hummus, pesto
Step-by-Step: How to Make 3-Ingredient Pan-Fried Halloumi
1. Prep the Cheese
Remove halloumi from packaging and pat dry. Slice into ½-inch pieces—thicker slices stay soft and chewy, thinner slices get extra crispy.
2. Heat the Pan
Warm olive oil in a skillet over medium heat until shimmery.
3. Pan-Fry
Place halloumi slices in a single layer. Cook 2–3 minutes per side, or until golden brown and crisp.
4. Finish
Remove from heat and drizzle with lemon juice. Add optional garnishes.
5. Serve Immediately
Halloumi is best enjoyed hot and fresh from the pan.
What to Serve With Pan-Fried Halloumi
- Fresh salads
- Warm pita bread
- Roasted vegetables
- Grain bowls (farro, quinoa, couscous)
- Eggs for breakfast
- Charcuterie boards
- Tomato basil salad
- Mediterranean mezze platters
Storage Instructions
- Refrigerator: Up to 3 days
- Reheat: Pan-fry for 1–2 minutes or air fry at 375°F for 3 minutes
- Freezer: Not recommended (changes texture)
General Information
- Prep time: 2 minutes
- Cook time: 6 minutes
- Total: 8 minutes
- Servings: 2–3
- Difficulty: Easy
Conclusion
These 3-Ingredient Pan-Fried Halloumi slices are crispy, savory, irresistible, and unbelievably simple. Whether you’re making a quick snack, building a mezze platter, or topping a salad, this dish delivers BIG flavor with almost zero effort.
If you love easy Mediterranean dishes, try my Pan-Seared Feta, Garlic Lemon Chicken Skillet, or Crispy Chickpea Bowls next!
Share Your Halloumi Creations!
If you make this recipe, please leave a review and share your photos on Pinterest—I love seeing your delicious ideas come to life!
Nutritional Information (approx. per serving)
- Calories: 230
- Fat: 18g
- Carbs: 2g
- Protein: 15g
Tips for Success
- Dry the cheese fully so it crisps instead of steaming.
- Use medium heat—too high burns the outside.
- Do not add salt—halloumi is naturally salty.
- Serve right away for perfect texture.
- Try different oils like avocado or garlic-infused oil for more flavor.
Frequently Asked Questions
Can I grill halloumi instead of pan-frying?
Absolutely—halloumi grills beautifully.
Why doesn’t halloumi melt?
It’s a brined cheese that holds its structure when heated, which is why it fries so well.
Can I eat it raw?
Yes, but it’s much better cooked.
Can I make this recipe without oil?
Yes—halloumi releases natural moisture and can be dry-fried in a nonstick pan.
Is halloumi good for keto diets?
Yes! It’s high-protein, low-carb, and satisfying.
More Recipes You'll Love
All Dinner Dinner
Cheesy Garlic Breadsticks: The Ultimate Comfort Food
Cheesy Garlic Breadsticks Thank you so much for being here today—truly. I get so excited about recipes like this because they check all the boxes: warm…
 Dinner
Savor Authentic Flavors: Traditional Egg Rolls from China Recipe
Traditional Egg Rolls from China Thank you so much for being here today—truly. Recipes like this warm my heart because they carry history, culture…
 Dinner
Church Lady Butter Toffee Pretzels – Sweet, Salty, Addictive & Totally Foolproof
Church Lady Butter Toffee Pretzels Thank you so much for being here today—truly. Recipes like this one warm my heart in such a special way because they’re…
 Dinner
My Mom’s Perfect Thanksgiving Stuffing: A Tradition That Never Left the Table
My Mom’s Perfect Thanksgiving Stuffing Thank you so much for stopping by today. Truly—sharing this recipe with you feels extra special.
 Dinner
Cheesy Keto Taco Soup – The Creamy, Low-Carb Comfort Bowl You’ll Make Again and Again
Cheesy Keto Taco Soup Thank you so much for being here today—truly. Every time you stop by to cook with me…
 Dinner
North Woods Inn Salad – The Iconic, Crunchy, Addictive Steakhouse-Style Salad You Can Make at Home
North Woods Inn Salad Thank you so much for being here today. Truly—sharing these nostalgic, beloved recipes with you always feels like swapping stories…
 Dinner
Garlic and Butter Flatbread Recipe – Soft, Warm & Impossible to Resist
Garlic and Butter Flatbread Recipe Thank you so much for being here with me today. Truly—every time you stop by to cook and create in this cozy little…
 Dinner
No-Bake Strawberry Cheesecake Jars – The Sweet, Simple Treat You’ll Want to Make All Summer
No-Bake Strawberry Cheesecake Jars Thank you so much for being here today—it truly means more than you know.